Create a Play
The play builder combines a digital whiteboard with structured metadata so coaches can iterate quickly and share diagrams with consistent naming. Use this guide whenever you add or update plays inside VReps.
Step 1 · Open the Play Builder
- Go to Coach Portal → Content → Plays.
- Click New Play. If you cloned an existing play, choose Duplicate instead so history carries over.
Step 2 · Configure Play Details
- Title — Keep it short and descriptive (
Horns Dive,2–3 Zone Breaker). - Level & Tags — Apply age group, season, or focus tags. Consistency here fuels search and reporting. See Tagging & Search.
- Primary Objective — Summarize intent (e.g., “Create a backdoor scoring option from a horns alignment”).
Step 3 · Draw the Diagram
- Use the toolbar to place players, defenders, cones, and text annotations.
- Drag handles to adjust paths. Hold
Shiftfor straight lines andOption/Altto clone shapes. - Create multiple Frames for motion sequences. Each frame can be duplicated and tweaked.
- Click Preview to animate and review timing.
Autosave & Versioning
- The builder autosaves every few seconds. Watch the badge in the top-right for status.
- Use Test Serialize (when enabled) to inspect the JSON payload that is stored in the database.
- For major revisions, duplicate the play first so you keep a fall-back copy.
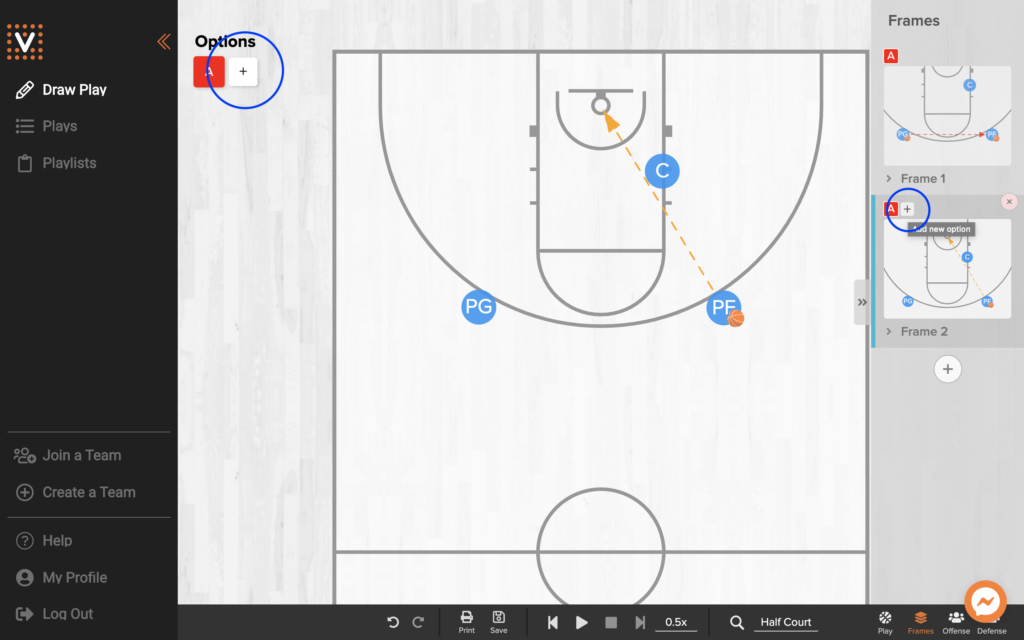
Add Branching Options
Play options give athletes multiple reads without duplicating an entire diagram.
- Draw the base sequence in Frame 1 as usual.
- In the Options list, click the + button to add Option A and Option B branches.
- Each option starts from the same parent frame. Adjust player paths to illustrate the new decision.
- Save the play to make the options available in the mobile app.
Step 4 · Attach Supporting Material
- Upload reference video clips or PDFs in the Resources panel.
- Add coaching cues, drills, or key teaching points in the Notes field—these render in the player app.
Step 5 · Publish
- Click Save Play to store the draft.
- Choose Publish to push the play into the shared library or leave it as a staff-only draft.
- Use Share with Team from the toolbar when you are ready to notify players (see Share Content).
Quality Checklist
- Does the title match your tagging conventions?
- Are all frames labeled and sequenced correctly?
- Did you attach resources players need (e.g., shot charts, audio cues)?
- Is the play assigned to the right teams or collections?